Tuesday, November 29, 2016

Last post: August...it's almost December

Wow! I know restoring a car can take a long time, but I don't think it's usually held up by tantrums and crying fits.
I'm sure no one really wants to hear another story about how hard this project is. How everything just seems to go wrong at that moment when I feel like something might just go my way. It's exhausting listening to someone go on and on about how the universe is against them and they are doomed to live a life of woe.
Well, I'm sorry, but that is how it goes.
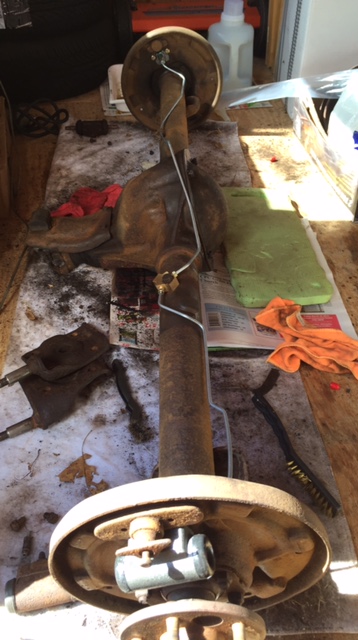
I'm still sitting here with stuck ball joints and control arms. I've gotten lots of advice and tried a few methods (not all...I mean, there's still hope that I can get some forward momentum again). I've gone the route of simply giving up on the brakes and deciding to work on other bits, and then go back...but then I get it in my head that I can try just one more time...maybe the rust has loosened up enough...maybe I'm a little stronger today. But that just ends in more tears, same old stuck parts, and NOT moving on to other parts...and me drinking the beer I didn't earn.
What is wrong with me, anyway? 
Why can't I just face the fact that I may have reached that point where I just can't move forward?
Well, oddly, I have friends who still encourage me and tell me 'you can do it!' and continue to offer advice. I miraculously have a husband who, despite his burning desire to have 'his' parking space back, still asks 'how's it going?' and 'are you working on the car today?' like it's just a normal thing for me to do on a Saturday afternoon.
But, I'm not sure how to move forward anymore. 
I'm so down every time I think about the brakes and then I get nervous that my bad luck will continue when I go to drill the hole for the bolt for the fuel tank. Then I think about using a grinder to cut bolts off, and envision a cutting wheel to the face as my brother and so many others all over social media have endured. I like scars, but I also like not going to the hospital to have parts of my tools taken out of my face.
But it has to be done. 
I have to just get out there and drill that hole.
I have to cut those bolts off, if they aren't going to budge.
I have to get that torch and heat up those parts.
I just have to do it. 
I've used a drill before...I've just never used one while lying on my back.
I've cut bolts and nails before...I've just never done it in such tight spaces.
I've never used a torch before...that'll be a first!

So I do go on with my life thinking it's totally feasible for me to eventually get to the day when I have finished this project. Well, to the point I can drive it, anyway. I had some things that didn't make the list of repairs due to budget constraints, but after the hell of the brake conversion, those things will be for the next owner to tackle. I don't need a headliner, carpet, spare tire or non-leaking windows.

Basically, I still haven't gotten to the point of giving up. Well, I have said it, but that odd husband of mine has talked me off the ledge and convinced me I'd regret that decision. And I would regret it, I just wish I was stronger and better equipped to handle the set backs. these moments of non-movement.
If I knew even a little about cars, I'd feel more comfortable about it all.
Maybe I should use my complete ignorance of the job as a tool to lift me up. It can be my mantra:
You've done more than most people with your lack of car knowledge!

Saturday, August 6, 2016

The longest brake conversion story...EVER

Saturday. 
One of the two days I am able to just get out and do what I can with the car, without any other obligations.
Three hours seems to be the maximum time I can manage without having a breakdown.
Now, I don't mean in the intense 'losing all control' sense of the term...just a mild 'okay...get out while you still have your wits about you' sense of the term.
So today's 3 hours of work got me a little further in the conversion process, but I'm still stuck on the driver's side. Still not able to move onto drilling the hole for the fuel tank strap bolt. Still not able to finish hooking up the brake lines (and then the brake bleeding process...ugh). Still not able to concentrate on running the fuel line.
Still stuck on getting the old suspension parts off and replacing bushings and boots.
But!!!
But, I still made some progress!
I bought this tool at Harbor Freight. It costs a mere $22.
And it worked wonders on the tie rod end!! I could feel the 'pop' up into my teeth when it finally came apart, but I was overcome with excitement and couldn't wait to just get all that stuff unstuck!
But!!!
But...
 so much pressure and nothing that should be moving was moving ...then...POP!... Yeah, it...wait a minute...it's all.still.together...and ...where's the other part of the tool????
Now seems like a great time to let you all know: I am always wearing gloves and glasses. And, if I'm being perfectly honest, knowing that this is a violent kind of prying apart of ...parts, I actually propped my rubber floor mat up in front of me, so that if anything DID come flying off at me, it hit that instead of my person. I don't mind bruises and cuts and scars and things like that (honestly sort of like them)...but I don't need to maim myself!
After that I pounded on my pickle fork. I tried the pitman arm tool...

...but...it was too wide. I ended up gouging the end of the lower control arm because i didn't realize it wasn't doing what it was supposed to be doing.
I got on the ol' facebook and posted some stuff...got some solid advice and virtual high fives from my car guys...
I released the jack I was using to support the lower control arm, hoping the problem I was having was simply a matter of pressure being applied in the wrong place.
However...
After all the struggle I could handle for the day...
I decided to see if I could get the rusted nuts off the upper shock bolts.
More spraying of rust stuff...more clamping of deteriorating shocks...more spinning of bolts...
 And then FINALLY....
...something went right.
And if you're counting...that's TWO things that went right for me today!
TWO!!
I wiiiiiiiinnnnn!!!!

Wednesday, August 3, 2016

same story, different day

This exciting project...this 'step outside my comfort zone' experiment...this test of patience...this 'I said I'll do it, so I'll do it' game I'm playing is really starting to feel a little 'Groundhog's Day'-ish. If Bill Murray showed up at some point, for some comic relief, it might make the adventure a little less tearful. On the upside, there's no one around to witness the meltdowns I have EVERY.SINGLE.TIME I work on the car.
Today's awesome fun time task: start taking those shocks and front brakes apart!
Well, after probably 30 minutes of 'how the hell am I going to get these damn shocks out!' Crying. Whimpering. Begging for some sort of 'ah-ha' moment to hit me. Hammer, mallet, screwdrivers, clamps, lots and lots of PB Blaster...and only my breaker bar to help with the shock nut because I don't have deep sockets for my impact wrench. whomp whomp.
This is what I ended up with before I gave up and moved onto the bottom bolt (hoping maybe somehow that would help with the top one, though, truly I knew it wouldn't)...
...all I managed to do was bend and mangle the shock! Vice grips...clamps...my own hand...nothing would hold the shock still while I worked on getting the nut off.
I managed to hold the bolt with one hand and use the impact wrench with my LEFT hand to get the lower shock bolt out...but, still could not manage to get the upper bolt off.
So, onto the next phase.

I actually started to make some real progress with the brake parts! With the exception of a few whiny 'why won't you just come off!?' and 'how am I gonna get the impact wrench in that tight space?!' I was taking cotter pins out and nuts off and bolts out...
Things were starting to turn for me!
I managed to get the steering knuckle out of the way so that I could get the knuckle arm off...

...except, I still haven't gotten that done. I can't seem to get the arm off the tie rod end (nut is off...the bolt just doesn't want to come out). I've tried banging it through with a mallet. I've tried my pickle fork. I was going to try the pitman arm tool, but it's too big to fit around the end.
So I moved on to the seal at the top of the arm...same deal!
Here, I could actually use the pitman arm tool, but it did nothing. Perhaps I have to take the jack out from under the lower control arm? Maybe I'm not getting the proper leverage?
At any rate, as with every 'go' at the car, the day has ended with another shopping list.
I should already have a set, but I don't...and I think it would've made the day go much more smoothly if I had a set of deep impact sockets. Both for this bolt holding the steering knuckle to the upper ball joint, and for that wretched shock bolt.
I think the most frustrating part of this project is that the little things that I think are going to be quick and easy 'and I can just move right on to the next thing' end up being the worst!! Nothing ruins my day like a stuck bolt! (okay, there are a ton of worse scenarios that can ruin my day.) Such a simple little thing, stuck, and putting the whole rest of the day's list on hold!
Stupid rusty bolts.
Now...off to do some shopping...

Wednesday, July 20, 2016

WARNING: i'm frustrated...again

I'm ...I just don't know what I am.
I'm not giving up. But, I just can't find the strength to get over this hump.
The very first time I pulled the trigger to spend money on this project was when I decided I would splurge on an upgrade to front disc brakes.
Those parts are still sitting in boxes, taking up space in the little 'corner office' Hubby set up for me to get myself organized. I can't sit at my desk, because there are boxes of rotors and flex hoses and dust caps and brake pads and...well, you get the picture.
The very first project I set out to do, has become the one I can't seem to get started!

As you all know, I know nothing about cars. I'm learning A LOT, but I don't really know anything substantial or helpful. This whole project relies on friends, strangers, the internet, and gumption.
Today, I ran out of gumption.
It always seems like a simple 'just do this' situation gets me all jazzed to get out there and get stuff done...but then I'm hit with the ol' 1-2 punch of 'not moving' and 'wrong part/tool'.
It's frustrating.
It's maddening.
It's wearing me down.

But, mostly because I just can't quit it.
I know Dad can't really see me and what I'm doing. Doing if 'for Dad' seems like a silly notion. But what isn't silly is doing it because if he WAS still alive, then I know he would be proud. Because if he was still alive, he'd be helping me get through this nonsense. He'd yell or make me feel like I was ridiculous for not knowing what to do, instinctively, but he'd get me through it. And, when he was on his 'death bed' and we asked him to let us have that car so that we could get it running again...and he agreed, with doubt in his voice...i didn't want it so that it could sit and rot in MY yard. I fully intended on getting this heap of scrap metal running again!

yes...I just pep talked myself. I definitely have a support system...there's no doubt about that!...but sometimes, even with the kind and helpful words of my friends, I can't find the strength to get through a day of stuck bolts without crying.
yes...I also just admitted that this project has me in tears. On more than this one occasion.
I don't apologize for it, but I also won't pretend it doesn't happen. It's a frustrating thing to spend an hour trying to get a bolt to move, simply to watch it spin and spin and spin...in place.

at any rate, here's where we're at:
fucking torsion bar adjuster bolts and blades that seem to be moving but not actually coming loose or moving me forward to getting shit done.
before height
after height
you can see there's a difference in exposed threads, but that bracket is stuck to that bolt like glue. Causing me to think that as I 'loosen' the tension on the torsion bar (that is, lower that control arm), I'm twisting all that other suspension stuff out of whack!
but...
front axle, very early in project
front axle, today
I thought the front bits where moving A LOT during all of my wrenching today. But, looking at today's pic compared to one from many months ago (before I even took that brake parts off!)...they don't look all that different. Maybe all that movement was exaggerated in my head?

Whatever the case may be, I had to stop. I was in a kneeling position with a breaker bar in one hand and a flat head screwdriver in the other for a FULL HOUR! I thought I'd never walk again, when I finally straightened my legs.

I just want a day to go...relatively smoothly and productively. I want to go out and spend time with the car and come back in and really feel like I've accomplished something. Right now I have have done brakes, half done fuel system, half done body work...I haven't finished ONE thing.
I just want to finish something.
I'll finish my drink, for now.
(and I'm going to finish this post without editing...)

Sunday, July 3, 2016

July 4 Weekend

Just another weekend here, for me. Saturday is one of my regular days off from the J.O.B., so I really should be working on the car every weekend. My excuse has been that I'm far too busy with other projects right now...but that excuse won't fly for the rest of the summer, since those projects are done.
I do have lots of irons in the fire, so to speak, but this car project is one of my priorities again.
So, onward and upward and back at it!!
I had decided to get the fuel system re-do going. so I pulled out the shiny new gas tank...to discover that it was not the right tank! I freaked out! I have had this since the beginning of May. MAY! When I got it, I was just so excited at how shiny and new it was that I didn't even think to make sure it was right. Rock Auto had not let me down, once, with all the things I'd ordered so far...I just took for granted that the past shipments had been spot on.
So, then I had the task of figuring out how to send back a gas tank. And hope that they would still let me return it, even though my window of return had closed just a few days earlier. I filled out the form online, regarding the return. I emailed, after my computer froze during the process. They emailed back, and things were worked out. The old tank went back yesterday and I got an email today that the new one is ready to ship.
as you can see, the new tank is flat, like a pancake...the old one is much more shapely.
No worries. 
I can still get stuff ready. 
Like figuring out the tank strap and just where does that J-bolt attach? 
Well, here's super fun bit:
it goes right there. which means drilling a hole where my friend was nice enough to weld the massive hole I had in the chassis...with the thickest sheet metal known to man, because that's what I happened to have in my shed. 


Well, we'll get to that later, shall we? Since I'm not a real pro with the drill, I need to be extra super sure that that's what I need to do. (though, I'm like 99.9% sure, since I have no idea where else it would attach, given that's the positioning for the tank.) My friend suggested it might actually attach through the trunk, but looking at my manual, I think it goes through the frame. Another question for the forum, maybe, to make sure I only drill what needs to be drilled!
Ok...so no tank and no hole for the J-bolt. I guess that part of the project can wait.
Onto the fuel line! 
That should be easy enough: 
detach at ports and pull off car. 
 First of all, I do not have dainty lady hands. I was told once (by a 14 year old boy, so I let it slide) 'you have manly hands'...well, he wasn't wrong. But somehow I got my hand and screwdriver in there and loosened that clamp. And then pulled and twisted  and yanked and swore and pried with a screwdriver....that hose was on there TIGHT! Which, of course, is good news when you're out driving around. Bad news when all you want to do is detach the freaking hose and move on to the next thing!
the struggle paid off...I still get very excited when I make progress!
I did have a plan for getting the old line out: cut the hose at the point just after it passes through the frame, and pull it out in two parts.
 I found this handy pipe cutter in a box of tools I lifted from my dad's house after he passed away. Originally I had thought it was a clamp, but I've used it several times (I actually had two but I broke one). Anyway, I was ready with a pan to catch any fuel that may still be in the lines.
It was at about this time, lying on the ground, totally aware of all the bugs and dirt I was rolling around and covered in, that I saw this little (not little) guy drop from the car to pull a caterpillar up with its web!!

I had one eye on him the rest of my time under the car. He was about the size of a dime.
At any rate, he did not keep me from my task at hand...
The line was cut and now just pull it through and up and out!
As if!
I couldn't get the proper movement to get the bend through the frame, so I had to make another cut. The first one was tricky getting enough room to twist the line cutter, but the second cut was of course easier, having the luxury of a free moving line.
I actually had some trouble getting it out of that clamp (the left side of the picture, above), until I stopped to sort it out in my brain and simply used some vice grips to pinch the clamp and just leave it attached (read:rusted) to the hose. Further down the back end, I had similar difficulty with the clamps and had to bend to break a few more.
SUCCESS! Old fuel line, out.
So, I managed to cross that off my list. It was a short list, because I've learned my lesson: budget about 3 times the time you think it will take to do a 'simple task', and make shorter lists.
Figure out a plan for the J-bolt was also on the list. Plan is in mind...just need to execute it.
Next on the list was to figure out how to work with my new sending unit for the gas tank. When I had to compare the old and new tanks, I realized my new sending unit also looked different from my old one. An extra port. 
Onto the Cuda-Challenger forum to see if anyone else has dealt with this and what the solution/s is/are. Some people simply cap the extra port. A fellow cuda restorer on facebook recommended I consider using it as it is intended, as a vent line.
Which I'm totally down for...but, how!? 
I mean, where does the vent line go? 
If my old tank didn't have it...how do I add it?
I at least know where to begin looking, so I opened up the trunk and checked out the filler pipe.
Looks like a vent line to me! However, according to the diagram in my Haynes manual, that simply goes back into the tank next to where the filler pipe attaches. So I'm kind of in the same place I was before, unless my replacement tank doesn't have the vent port by the filler attachment...or...I can vent it as the manual says and just cap the second port on the new sending unit.
But, that will be a task for another day, since, as we learned at the beginning of this story...
you must examine your packages upon arrival or suffer the consequences when you really should be moving forward, but instead you're making more work and pushing yourself further behind schedule...wait...what lesson am I trying to teach?
It doesn't matter. 
What matters is that I have plenty more Saturdays to chip away at this beast. 

Wednesday, June 8, 2016

working...but not on the car, really

Boy this project has its ebbs and flows. Years of not doing anything seems to turn to days of work...then back to bad weather/busy schedules/waiting on parts...then stuff starts to get done again...and now, back to the back burner it goes.
I do remember a time when my list consisted of: homework, wash dishes, baby sit, read/play with Barbies/catch frogs and lady bugs.
Now, if I want to catch frogs, I have to hope I see them during my skate dates! Okay, you caught me. I still find time for fun. (and i did have to coax a frog across the bike path after almost squishing him under my skate, a couple days ago.)
But the car has dropped on the list again, sadly. It's crunch time for me and my Relay for Life team. In just about a week, we're taking the track to camp out and walk for 24 hours, all in the name of raising money for cancer research and patients. All year long we've been raising money, but this last week before the event means making posters, airing out tents, making lists and getting the new teammates prepared, making cupcakes, lining up last minute events, and this year we got shirts printed. We all help out, but man this last week is exhausting! I'm actually looking forward to just walking! (last year, i stayed up the full 24 hours and ended up walking 30 miles!!!)

Anyway...there's that...
plus, my very best friends and i have our 'girl gang' and we hang and skate and just have fun whenever we can get away from work all at the same time. Since it's a rare scene these days, i never pass that up!!
Jen, Susie, and Me...post skate date
Last year, around this time, my sister and I took a quick trip to Detroit to visit mom...did it again this year and had a blast..again...of course.

I saw, and was told about this cool bar/restaurant, Vinsetta Garage, last time and just HAD to go this year. A.Maze.Ing! It's an actual old garage. The old wooden door opens in nice weather, which it was when we got in, and it's just a cool venue. The burgers were to die for.
We also hit up the zoo, which was fun...I love penguins. We took my mom to see some kick ass roller derby, as the Detroit Derby Girls had their league championships that weekend. So fun.
We also went to the local brewery, near mom's apartment: B. Nektar Meadery

And so after the relay event, a week from saturday, my sister, a friend and I are going to see Heart at the local concert venue, Cape Cod Melody Tent.

But after all of that....my free time goes into this car. I had hoped to get it done to drive to the concert, but I knew that was quick a lofty goal. I'd be happy just to have the main systems i'm working on now, done.
I've been struggling, still, with the dreaded torsion bar. I finally got the bushings and I'm pretty sure I have what i need to get that suspension/brake conversion done, but ...well, I have mixed emotions.
I have people warning me that if something goes wrong there, it goes really wrong and it could mean bodily harm. Now, i'm totally into scars and don't care if i cut myself and am fine getting a little of my blood on this car (KISS ARMY style!), but I'm not into losing important things like fingers or eyes or arms.
But there's a part of me that just wants so badly to do it. Get it done and say, 'there. it's done. what's next?'
That's the part that I think will win out. That's the part that has been pouring over my Haynes manual, scouring Cuda forums, and googling the shit out of 'adjusting torsion bars' and 'A-body suspension' and 'how to release the tension on the torsion bar of a '67 Plymouth Barracuda A-body without losing a limb'...
Today I was forwarded a video that made my day. It clearly showed where to jack up the car and what the adjuster screw looks like when the load is off the T-bar and you're safe to start work. It made my heart sing.
So, my plan has been adjusted a little, since I won't be attempting to finish the car by June 25. Now, the floor weld is non-essential. However...not sure how I'm going to mount the fuel tank with the rusted trunk and ...I'm pretty sure the patch my friend did on the frame rail is where the J-bolt for the mounting strap may have rusted out. So there's that.
But, I'm not discouraged! And I still love it when parts get delivered!!!

As I told my friend, I am amazed every day that I remind myself that I'm working on this car. The fact that parts are going back on brings me utter joy.
It's a restoration project that I started blogging about in 2010!!! That's 6 years ago, folks!! W.T.F?

Next post will be about actual work...I promise hope.


Sunday, May 15, 2016

a good day

start of the day

Well, more than a month later, i'm ready to share some more of my journey.
My car guru and friend, Pat, had set aside a full day in May, to help me get stuff done.
After puttering around and doing a little here and a little there, to the best of my ability, that day finally came and we got some major things tackled.
Now, don't for one minute think that I'm in any way making light of the work that I have done on my own. With guidance and a little determination, I have managed to actually start this project...take a leap of faith in myself and order parts...put a few things together...and, toughest of all, accept help!
Yes, accepting help is really where it began, and something i struggle with daily. But there is no way I could've gotten as far as I have, nor could I ever even dream of finishing this, without help.

Here's the kicker: my friend sets aside a full day to help me. I clear my schedule and make sure we have a clear list and (almost) everything we need to just keep on trucking until the list is complete or the sun goes down,whichever came first.
But when have you ever had a day that goes totally as planned? For me, that day does not exist.
We were offered a free, private plane ride around the Cape for a friend's birthday, so my day was cut short...and Pat stayed behind to finish up.
It was a great day, but boy did i feel like a jerk. (He, of course, was fine...)

Regardless of my personality flaws, we got a lot done. I have days, during this project, that I look forward to:
1. the day parts started coming in,
2. the day I fixed something or put something together on my own,
3. the day the rear end finally starts going back on,
4. the day the disc conversion is finally done,
5. the day the fuel and exhaust systems are squared away,
6. the day the engine (hopefully) turns over, and ...of course...
7. the day i back it out of the driveway and go for my first drive.

Well, 1 and 2 happened months ago...and it was thrilling for a person like me. I have always had a love of old muscle cars, simply because of my dad's love of them. As I got older and had my own thoughts and feelings, I just couldn't deny the beauty of old cars...especially growing up with such plain and uninspired cars. I've really come to love the simplicity of the older engines, and the idea that anyone can figure out what's going on in there, if you just think about how it all works together.
But, let's be honest! I know absolutely nothing about cars and how they work! So running brake lines or disassembling something that I'll eventually have to put back together is a really big for me.

And yesterday, we accomplished #3. All i've been able to think about is getting that rear end back together. I've just been thinking, 'if i can just get some parts back on the car, then it'll be real. It'll be progress and a move forward, instead of just standing still and sitting on parts.'
The feeling I got when i stepped back and looked at the tail end of the car was pure joy. Finally, instead of just seeing a car seemingly hovering, as it sat on those jack stands for it's 3rd year in a row, I saw a car with a rear axle and new leaf springs. I knew that the driveshaft, with its shiny new U-joints, would be going back on soon. I knew that I could finally finish attaching the new brake lines and e-brake cable. I knew, up front, was a brand new master cylinder waiting to be part of the new braking system.
Luckily, when asked to recall how the parts came out, so we could put them back in properly, I was instead able to consult my repair manual.

I still have a long way to go before i'm at #7, when i drive to A&W for a root beer float, but progress is progress. This is a huge project that I felt like abandoning dozens of times, but did not. I'm lucky for my support system, for sure! It's a lovely feeling to have people who believe in you!

As i head into a long vacation, I have my lists started. A trip to see my mom in Detroit means i give up a saturday to work on the car again with Pat, but it'll get done, and being in detroit with my mom has a strange effect on my determination. It's the Motor City! It's where my parents grew up in the 60's....it's like going back to where my car was born!! (almost...if you've been here from the beginning, you may remember our car was built in Hamtramck, MI...at the plant where our great-grandfather worked!)

anyway...words, words, words...here are some pics. I cleaned a lot of parts and am kicking myself for my lack of documentation of before and afters. One track mind, i guess...so i stole a few from Pat!
old master cylinder
new master cylinder (Pat's pic)
cleaning the driveshaft


frame rail hole :(
fixing the hole! :)

end of the day


Sunday, April 10, 2016

let's talk about frustration

what do we know?
well, i have my conversion kit. parts in boxes just waiting to be put on the car. those boxes are slowly being emptied. and i do mean S.L.O.W.L.Y.
that's okay...i mean, who ever restored a car, one that had been sitting for 10 or so years, in a weekend?! nobody, that's who! and after years of sitting...3 of those years, in my own yard!...who am i to think it would go any faster?
honestly, i'm already impressed with what i've been able to do. it may not seem like much to a car person, but to me, it's something.
consider this: 2 days ago, i couldn't get anything to work out. literally wanted to just smash the thing into bits so i could at least get the pleasure of hearing glass break.
but i just stepped away and decided to just try again the next day...maybe something would come to me in a dream.
not a dream, exactly but i did have some time to think things through a little...you know, without actually also trying to do stuff, and i came up with a way to simplify one of my problems!

(i think i've strayed a little from my original thought, here...)
back to the beginning...we know i have parts and that some parts are getting back on the car. we know i have run the brake lines but not very well. we know i have the old master cylinder out, but that there is a slight problem with the new master cylinder and the adapter fitting into the old slot. (this is where my little daydream comes in...more on that later.) we know (i think i mentioned it? maybe not) that the e-brake cables were giving me some trouble. in fact, i tried to finish getting them out yesterday (when i had my meltdown) and had to do more wire cutting in order to finally get the cable out. what a pain!! again, after walking away from a project i knew i would not finish, being as frustrated as i was, i went back out today and managed to move a little further with that task. the main cable is in, but i had reached my breaking point again, and left it to be re-connected to the handle and secondary brake lines later.

yes, there is a pattern of frustration. i am a person who can not figure out why i can't do something. what makes some tasks just seem so impossible? other people do it...where am i lacking? what am i missing?
stepping back gives me some time to think...
think, 'yes, it's true. other people CAN do this. and so can you...it will just take you a little longer to figure it out...you'll have to ask more questions...you'll have to make more mistakes...you'll have accept that you don't know the shortcuts or tricks that will allow you to get brake lines run in a few hours.'

and so after i talk myself down off the ledge, i give it another go...
here's what i've been working on, and continue to struggle with, at the moment:
1. brake lines: finessing and getting them to lay smoothly and get back in their retainer clips
2. master cylinder: figuring out the best way to get the new one in so i can finish the damn brake lines
3. rear axle: getting the differential cover back on (yes! i finally found a new one!) and changing out the axle flange gaskets so i can finish the damn brake lines and get the rear axle back on the car
4. freaking leaf springs: ugh...i don't want to talk about those right now...

here's what i'm talking about with the master cylinder issue....making this template, to have a better view of what needed to be done, was what my 'dream' was about:
as you can see, the dark black line is the shape that should fit into the hole where the old master cylinder came out. however, the actual hole where the MC came out is the more faint 'rust' outline. i'm thinking i could just get some snips and cut out the bits to open the hole to fit the adapter in. but then the upper and lower bits would still be open, but COVERED by the adapter, once the whole thing is installed. would that matter? would a couple little gaps make any difference...maybe in the stabilization of the MC...but, wouldn't those four bolts hold it tight and in place? (these are the things i just wish i knew...or could figure out...)

and, i really did have more trouble with the brake lines! specifically the e-brake cable. after my friend cut the secondary lines off, i went to work getting the main cable out. sure...just unbolt it from the lever...pull it out and through, and put the new one in! well, great...if the back connection isn't practically welded to the frame!
i ended up cutting that line...oh, so much work! and, of course, after the struggle, all the little wires were all spread out, making pulling the cable through the housing pretty difficult. once i had that stuck bit exposed...i hit it with a hammer. sheer joy washed over me when that thing popped out the other end! the struggle wasn't over there, but eventually i got the whole thing out...and the new line in, but not at all connected to anything.

the rear differential cover is on it's way from the other coast. in the meantime, it is my plan to rent the slide hammer from AutoZone tomorrow and get the rest of the axle work wrapped up so i can just put the new cover on and be ready to put it back on the car.
which leads me to the leaf springs. pretty sure i finally have everything i need for that, but i really need to get one thing finished before i open that can of worms...but by the end of the week i should be getting that set up and ready.
and the weather is still not all that great, yet! we haven't really hit 50 degrees yet and the wind makes working outside the carport pretty awful.

oh...but maybe i should getting my fuel lines and system ready to work on!? time to get the credit card out again, i guess.

Monday, March 28, 2016

weekend recap

my plan for easter? well, since i don't celebrate...and had to work, anyway...i thought i'd take it easy. 
i got out a little early and thought i'd get my workout in early and just veg out for the rest of the day. 
but when your car buddy calls and asks if you have time to get together and work on the car, you say 'yes'!! 

if you've been following along, you know i had some trouble getting the old master cylinder out.
wait...did i blog about that or simply post it to my facebook page? 
well, regardless, you know i had trouble getting the master cylinder out.
my friend, Pat, and his lovely wife said they'd stop by and take a look at what i've been up to with the car and try to get those rusted bolts unstuck.
and he did.
now, before he got here, i had already undone the bolt to get the push rod out, because it was the least i could do. i also felt nervous about revealing the unfortunate realization that the old MC had 4 bolts, while the new one only had 2.
we discussed our options, once we got the old unit out and saw the space would not be filled by the new unit. and we had a busted bolt to deal with since, as i said...10 years worth of rust had built up on those things! not to mention the ridiculously tight space you need to get into to loosen the bolts!

but, in my usual anxious fashion, i couldn't stop thinking about how i got a part that didn't fit, when it was supposed to be made to retrofit these old cars. 
had i given wrong information and gotten a part for a different car? 
so i went to the source...first i checked my invoice: '4 bolt master cylinder...' Nope, that's what i was replacing.
so i went back to the website. the parts they make are all 2 bolt units....and they make an adapter to go onto the 4 bolt space.
so my mind goes back to the kit i got...i did vaguely remember a plate that i was curious about.
now, all this is happening late at night and then as i woke up for work at 3:30 this morning. which meant it was not the appropriate time to be rifling through boxes of car parts. once i got home from work, i did find it.
so now we just have to deal with the broken bolt and then misalignment of the adapter and the old space...
the space that diamond 'bump out' has to fit into is actually slanted, in the car. there will be a little adjusting before this gets put in
 in other embarrassing news:
those  emergency brake lines i was so worried about getting out turned out to be another simple clamp removal. maybe by the end of this project i'll be able to think 'oh, maybe it's just a clamp' when something seems to be stuck forever.

also this weekend, i ordered the bolts for the front hanger bracket for the leaf springs, which i will pick up tomorrow.
and my flange gaskets and oil seals came in...as did the brake cable equalizer.

all of that means i should (should) be able to get some work done on my day off this week.
but, as i've been learning every single time i go out to work on the car, there are no 'quick' jobs. it is my hope that i can fix the mess of brake lines i put in on saturday and move on to a little more work on the rear end.
and, as always...i'll be studying my favorite youtube videos!

and just so you're not all worried that i didn't get to relax on Easter sunday...not only did this amazing couple come over and help me out, they brought along some smoked maple bourbon that i've been wanting to try.
in the end, it was a lovely day.

Thursday, March 24, 2016

a productive day (for me)

i am pretty darn pleased with what i did today.
sure, i didn't really accomplish anything that allowed me to actually cross something off my to-do list for the day, but i spent several hours working on the car and i did get stuff done.

i've had to abandon the rear axle project due to some stuck parts, as i await the arrival of some other parts, so i've moved back to the brakes.

after cutting the line, since i couldn't get the connections to budge, i went back to get this bit unhooked...and it just popped out of the bracket. of course, as you can probably guess based on the amount of rust everywhere else, the clips were all rusted and difficult to open up and get the lines out, but i did it. more than one time i was really happy to have my safety glasses on!
 in order to get the proportioning valve out, i had to cut pretty much every line and pull it out through the engine bay. the plug that leads to the electrical unit was pretty stuck on, so i couldn't get a good grip on that until i pulled the prop valve out. basically, the old brake lines came out in no less than 5 pieces. i'd like to take this opportunity to voice my appreciation for the line cutters i happened to find in a box of tools from dad's house.
i was about to get the old master cylinder out, too, when i thought i might need a second set of hands to do something inside the car (remembering from a video i watched), so i wanted to be sure before tackling that one today
i'm still struggling to figure out how to get the parking brake lines out. mostly because i did this...
why on earth did i paint that POR15 over this line and connection? how in the world will i get that off? a struggle for another day...i didn't have it in me today.

so i moved onto the front suspension/brake conversion. i wanted to get all the unnecessary bits off so i could replace it with the new parts i have for the conversion, but i need to take a look at my reference videos and correspondence again, first. 
i'm embarrassed to admit how long i struggled with this next bit. i tried unscrewing the line. i tried cutting the line, thinking i could get the impact wrench out once the line was gone. at that point i noticed how the line was spinning and realized i just needed to remove a clip. i've never had more 'doh' moments than with this project. really. most days i'm glad i'm working alone, so no one sees my stupid moments...though, i could save a lot of time having someone there to say...'hey, dummy. just pull the clip out.' 
every day's an adventure, though, and i'm actually enjoying it!!
once i got the last lines disconnected from the backing plates, i was able to grab my favorite tool, the impact wrench. and this is where i thank my big brother for the electric wrench he gave me. when i first started this project (3 years ago?!) i thought i was so cool. and i went to Harbor Freight Tools to get my first tools. i had been taking a basic auto repair class and we used those impact wrenches all the time. so i bought my very own. and brought it home, ready to get the rims off the car. and realized i don't have compressed air, like i do when i'm in class!! i borrowed an air compressor from a friend, but that wasn't really practical. Dan came over after that and gave me his wrench. i have been super grateful for that. sure i could've bought my own, but this way i save money and i have a nice story to tell.
getting back to today's work....
this was the last of the tasks i was able to finish today. i am not 100% sure how much more of these bits need to come off. and i'm still nervous about the torsion bar and how the removal of the ball joints and control arms will affect that. 
more videos and research and i'll get to that in the next couple days, though.
now that the brake lines are out, i can start putting the new ones in.
i need to get the old master cylinder out, so i can put the new one in.
i need to get that foolish parking brake issue taken care of so i can put in the new lines when the equalizer shows up in the mail next week.
i need to figure out the drain/fill plug on the differential cover. 'plan B' plug showed up today, so if i have to i can drill the old plug out.
the axle shaft flange gaskets will be here next week, too, so i can rent a slide hammer and swap those gaskets out. 
i still need to get my lazy butt to the hardware store for bolts so i can get the leaf springs in.
it always seems like just a bunch of little loose ends, but the snags i hit along the way tend to turn it into more time consuming tasks. but it is nice to finally feel like i'm making some progress on my own here. my safety net of car guys is giving me more confidence, of course. 

Sunday, March 13, 2016

it's a restoration...it's not going to be smooth sailing


so, in my last post, i revealed my first really big step towards getting the car back together. that is, my first really big step without adult supervision. I removed the differential cover on the rear axle so i could replace the gasket. (here's that post, if you missed it)
well, not that i've abandoned that project, but i've hit a bit of a snag. the snag being my own stupidity and procrastination. basically, i went out early yesterday morning to get what i needed to move ahead, but got the wrong kind of adhesive. well, i got a silicone RTV adhesive, which i can use when i get to the window seal part of this undertaking, but i'm pretty sure it's the wrong stuff for the differential.
not a big deal, really, since i have many other things i can occupy my time with these days.
the floor has been kind of on the back burner, because i just couldn't figure out how to get the seats out, with this car stuck in the car port. well, i unbolted the seats and just moved them to the back seat, basically. of course, that made getting the carpet out, a real pain in the ass. (full disclosure: the job of getting the carpet out was done a few days ago. it took me 2 hours of struggling and repositioning the seats and eventually just pulling really hard because i could not get the seat belts un-bolted, and 2 screws on the drivers side door rail were stuck from all the corrosion.)
this is how it stayed for a long time...as i struggled to figure out how to get the bench seat out

after the carpet came out. i was able to asses the rust situation
you can see the majority of the rust is concentrated on the driver's side. where the window leaked a lot. the car sat for years without a cover
the driver's side door rail...those last 2 screws wouldn't budge.
though you can see the corrosion was so bad, i was able to just pull the carpet out from underneath
yesterday was the day i was planning on really spending time on the car. i wasn't thinking about all the time spent brushing the rust...sweeping and vacuuming...then the prepping and dry time to apply the POR-15. but that wasn't the half of it! i can find things to do while i wait for stuff to dry. the problem was the degree of rust that was going on under the gas pedal. 


a tiny hole turned into a slightly bigger hole and then i found more...which also got bigger when i applied a little more pressure and elbow grease. sadly, welding a new floor panel has become a necessity. i already have major damage inside the trunk and a little issue with the chassis...i was hoping to avoid something like this.
but i am not discouraged! set backs are inevitable with projects like this. i have a good support system in place, so i have faith.

so what did i do while waiting for cleaning products to dry?
i moved back to the rear axle. though i didn't have the sealant to get the gasket in just yet, i do have all my new brake lines, so i figured 'why not tackle that!?'
once again...a little snag. i couldn't get the brake line disconnected from the wheel cylinder. so i cut the line. and then went through all manner of pliers and wrenches and maneuvering to try the get that little bastard out...i finally managed. after the day i was having, it felt like a major victory!
I replaced the new wheel cylinders and tee and screwed in my pre-bent rear axle brake lines! again...what a victory to actually be putting things back together!
the old and the new
but then...another 'uh-oh' moment. something just doesn't match up and i think it means i need to remove axle shafts and replace the gaskets! which i was so hoping i wouldn't have to do...
unfortunately...
driver's side
passenger's side
...neither of these gaskets seem quite right...
and that's where we're left. with me looking at renting a slide hammer to remove the axle shafts. at least the axle is already off the car. 
there's my silver lining.
one more time...
silver lining.