so, in my last post, i revealed my first really big step towards getting the car back together. that is, my first really big step without adult supervision. I removed the differential cover on the rear axle so i could replace the gasket. (here's that post, if you missed it)
well, not that i've abandoned that project, but i've hit a bit of a snag. the snag being my own stupidity and procrastination. basically, i went out early yesterday morning to get what i needed to move ahead, but got the wrong kind of adhesive. well, i got a silicone RTV adhesive, which i can use when i get to the window seal part of this undertaking, but i'm pretty sure it's the wrong stuff for the differential.
not a big deal, really, since i have many other things i can occupy my time with these days.
the floor has been kind of on the back burner, because i just couldn't figure out how to get the seats out, with this car stuck in the car port. well, i unbolted the seats and just moved them to the back seat, basically. of course, that made getting the carpet out, a real pain in the ass. (full disclosure: the job of getting the carpet out was done a few days ago. it took me 2 hours of struggling and repositioning the seats and eventually just pulling really hard because i could not get the seat belts un-bolted, and 2 screws on the drivers side door rail were stuck from all the corrosion.)
 |
| this is how it stayed for a long time...as i struggled to figure out how to get the bench seat out |
 |
| after the carpet came out. i was able to asses the rust situation |
 |
| you can see the majority of the rust is concentrated on the driver's side. where the window leaked a lot. the car sat for years without a cover |
 |
| the driver's side door rail...those last 2 screws wouldn't budge. though you can see the corrosion was so bad, i was able to just pull the carpet out from underneath |
yesterday was the day i was planning on really spending time on the car. i wasn't thinking about all the time spent brushing the rust...sweeping and vacuuming...then the prepping and dry time to apply the POR-15. but that wasn't the half of it! i can find things to do while i wait for stuff to dry. the problem was the degree of rust that was going on under the gas pedal.


a tiny hole turned into a slightly bigger hole and then i found more...which also got bigger when i applied a little more pressure and elbow grease. sadly, welding a new floor panel has become a necessity. i already have major damage inside the trunk and a little issue with the chassis...i was hoping to avoid something like this.
but i am not discouraged! set backs are inevitable with projects like this. i have a good support system in place, so i have faith.
so what did i do while waiting for cleaning products to dry?
i moved back to the rear axle. though i didn't have the sealant to get the gasket in just yet, i do have all my new brake lines, so i figured 'why not tackle that!?'
once again...a little snag. i couldn't get the brake line disconnected from the wheel cylinder. so i cut the line. and then went through all manner of pliers and wrenches and maneuvering to try the get that little bastard out...i finally managed. after the day i was having, it felt like a major victory!

I replaced the new wheel cylinders and tee and screwed in my pre-bent rear axle brake lines! again...what a victory to actually be putting things back together!
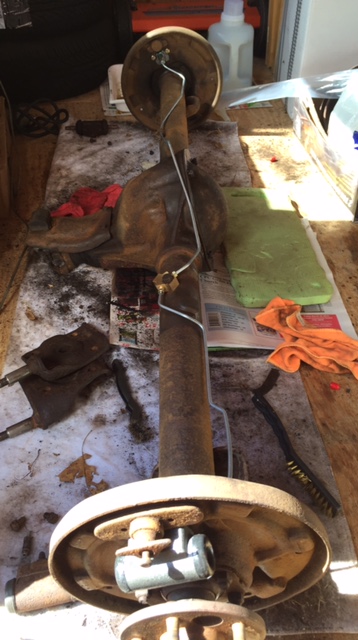 |
| the old and the new |
but then...another 'uh-oh' moment. something just doesn't match up and i think it means i need to remove axle shafts and replace the gaskets! which i was so hoping i wouldn't have to do...
unfortunately...
 |
| driver's side |
 |
| passenger's side |
...neither of these gaskets seem quite right...
and that's where we're left. with me looking at renting a slide hammer to remove the axle shafts. at least the axle is already off the car.
there's my silver lining.
there's my silver lining.
one more time...
silver lining.


 Posts
Posts


