Wednesday, May 15, 2019

Forty degree mornings in may...not helpful

Spring has been very cold...and rainy.
We've had 2 nice days this spring. That is it.
The carport roof has been down for months and the car is just covered by two old generic blue tarps...one of which may as well be netting.

The result was a large puddle on the passengers side floor, as well as a smaller puddle on the drivers side floor.

Possibly the result of bad window seals...


...possibly in conjunction with the cracked vent...

(both sides are cracked and I'm not sure how long this critter bedding has been here, but it's probably fairly new)
Or, maybe the window, vent AND bad tarp all played part.
With more rain just filling up the forecast, I swapped tarps to at least get a little more protection. Seemed to be doing the trick last I looked but that was 2 days ago.

Today, I am expecting the delivery of my new tarp to replace the missing roof. I'll be rigging it up with some bungees and zipties, just to get some protection. It will not be a full roof replacement but that was for two reasons:
1. I actually like having the sun come through while working, but still have the privacy of the walls.
2. I really like the ability for the wind (which also is relentless) to cut through the carport without ballooning and wanting to take flight!

So after finding the puddles, all I've done so far is take some pics from underneath, reattach the front bench seat, and do a little spit shining to remind myself how beautiful the beast will be when it's running (not 'finished' of course since there's so much to do that I am just not financially set up to do) and I can just go shine her up and tool around causing traffic jams during my sunday drives!


Wednesday, October 24, 2018

Summer recap

I've been pretty bad about blogging this project. I usually do a quick post on my steemit page when I have a day of work in the books.

Here's the run down:
1. finished the rear drum assembly, though I had to use some parts from the new spring kit and some from the old set up because things weren't going smoothly. Plus, I really had to rig things up to act as a second set of hands. But I did it. And the drums seem a little tight, even with the adjuster at it's shortest setting, but I've moved on.

2. I had a set back with the front disc conversion, when I finally thought I could move on to that section. Pulling out the disc kit I bought 5 years ago, I found the rotors to be too big...wrong bolt size.
After some searching and waiting for backorders to ship, I now have the proper sized rotors. Unfortunately, I am anxious to install them, as I may need spacers to get the calipers to fit into my tiny 14" rims. So...I still have not started the front disc installation.

3. While waiting on working on the front, I decided my plan of attack would just be to finish up the rear, first. Oh, yeah...the fuel tank! I thought that would be pretty straightforward. (I was wrong, again.)
       a. The 'J' bolt I had was the wrong style. which we realized as we struggled with the tank install
       b. with new bolt, I managed to install the tank alone. but couldn't get the filler neck into the new gasket.
       c. realized new gasket was also wrong, but this time I had the right one, which I had forgotten I had...which is what initially led me to ordering the wrong one!
       d. with new gasket in the new tank, I was able to finish the tank install

4. With new tank and rear drums done (and the trunk patch done well enough for my purposes), the rear end needed
      a. fuel line connected to sending unit on fuel tank :DONE
      b. rear shocks installed
      c. all rear end nuts torqued: I'd rather not talk about it but let's just say my torque wrench was out of calibration and I broke a nut...and have to go back and do it over after loosening all nuts I thought I had finished. So...still needs to be done.
     
5. Once I finish the list in point #4, I can move on to the front. My hope was to finish up and get the car on rubber and off the jack stands by winter so I could take down the carport and just tarp the car for the winter. But now I am considering just finishing up the brakes and such and wrapping the four wheels in plastic (as suggested by a member of a car group I'm in) and leaving it off the ground for one more winter.

And that's my summer in a nutshell. I'll bolt the bench seat back in and make sure my new door seals are in order and that will take care of all the cosmetic issues I was planning on addressing. The headliner and carpet are simply not in the budget.
I am putting a lot of faith in being able to get the engine running, since I've worked backwards, but when you're kinda flying by the seat of your pants, you do what feels right.

Sorry no pics...I just don't have it in me today.
Happy fall-into-winter!

Thursday, June 21, 2018

I've been working, I swear!

I've been getting a few things done, here and there. A friend told me about another blog 'venue' where you can actually get paid in cryptocurrency, for posting, so I've been putting my blogging energy in there, since I definitely don't have the time for double blogging. ( You can check it out here, if you want, but it's not just car blogging and I'm about to give you the abridged version of what I've been doing since the weather has turned from winter, to spring and to now, the first day of summer.)

Let's see, the last post was about how winter was cold and windy, though not terribly snowy overall. I had purchased a gator grip socket to try to get the fuel cap, and subsequently the filler neck, out of the car to make putting the new tank in a little easier.
That didn't work, so I decided to just struggle with it, with the filler neck still in.
Unfortunately, that plan didn't work, as i couldn't get the pipe to line up with the hole in the tank. It's just me, mind you, with the tank on a plank of wood, using a jack to raise the tank into place.
It was not working out.
I abandoned the fuel tank so that I could just bite the bullet and order the proper socket for the security screws and just take the neck out and do it right.
I did have to use a flathead screwdriver and a hammer to loosen the screws anyway, though, thinking 'why didn't I just do that in the first place!?' but also decided that eventually the screws would have to go back in and the socket would come in handy for that.

So, again...raising the tank alone was just not working out. In the meantime, I also decided that I'd just go ahead and order a new collar for the filler neck to replace the cracked one I had. (not sure it's called a collar, but it's the part that seals the trunk where the filler neck goes through the trunk floor and into the fuel tank)
That should be here Saturday, and Hubby has agreed to help me raise the trunk since I have admitted I have too short a wingspan and/or not enough limbs to do it alone.

Besides that nonsense going on, I had a bit of a struggle with the rear brakes. It has been years since disassembling them and I had not taken (or could not find) very good pictures of the process. YouTube, my manual, and whatever pics I could find on the internet were the best I could do.

After stretching the whole process over a few weeks of working on my days off, I managed. Barely. 
And there's some rubbing at the top of the shoes on both driver's side and passenger's side. I've not put the new drums on yet, and they seem to be quite a bit bigger (deeper) than the old ones, so I'm not entirely sure I won't just be using the old drums after all that.

Once I finally finished up the rear brakes, though, and hooked the brake pedal to the master cylinder push rod, I thought 'yes! the brakes are done!'...
...but I haven't even started the front disc conversion. I've finally got all the new knuckles and suspension pretty much squared away (I think...I hope), but the brake conversion is still in boxes. 
And then the anxiety of that set in.

But that's where we are now.
Hoping to button up the fuel tank, and basically the rear end of the car so I can move up to the front brakes...
And after that, I start playing with the heart. The engine. The real test of the whole project.

Until next time...

Wednesday, March 7, 2018

Winter = a lot of down time

It hasn't been a particularly snowy winter, this year; but, it has been tremendously windy. Gusty.
Other than  a couple very cold days, we haven't even had any real winter coat days. We are currently in the beginnings of another pretty bad wind storm, though.
As I said...tons of wind this year.
This past weekend we had a storm that didn't produce much more than a few hours of rain, but with gusts hitting mph in triple digits at times, I am thrilled to report that the car port is actually still standing.
For now, that is, as this next storm's gusts have started to blow. This one is only expected to produce 55mph gusts, but I don't count any chickens until they've blown out of the nest.

In the meantime, I have wasted yet another winter when I could've been working on indoor projects such as really getting that carb cleaned and getting the sending unit and gaskets on the new gas tank.
I blame the stress of dealing with getting a new roof, finding out that it was not the real cause for the leaky roof, then dealing with getting the chimney rebuilt.
Ah, home ownership sure does know how to make a person feel like they will never get ahead in life. I don't mean that to sound like I am not grateful to have the means to fix our leaky roof, which I know we are lucky to have over our heads, but I do feel like that carrot just gets farther and farther out of my grasp.

But that is just a moment in time, isn't it.
Looking ahead, we still have the fence to fix, now that it has gotten even worse with these wind storms...

OH! and the car, of course.

When I go through the list in my  head, I see myself driving the car by the end of this summer at the latest.
Then when I put lists to paper, it is clear that I am putting a lot of faith in every thing on that list will just be a matter of execution, and move along with no problems or set backs.
And, if the history of this project...hell! the history of the world...has shown us anything, it's that nothing moves along without issue.

However, I do have faith. And with each tasks I've crossed off my list so far, I have gained the confidence to believe that it is possible, even with set backs, that this car could have me sitting behind the wheel and cruising the Cape at least before next winter.

I have not been keeping up here, mostly because I've not done much with the car, and I like to keep this blog devoted to just that; but, also because I've been blogging on a new site where I am making a little bit of cryptocurrency on a platform called Steemit.
Friends of mine told me about it and I figured, what the hell...doesn't cost me anything and if I can make a few cents here and there, it will add up eventually, right?
Anyway, if you're interested in the other bits of nonsense going on this winter, while the car sits waiting, here is the link to my Steemit blog.

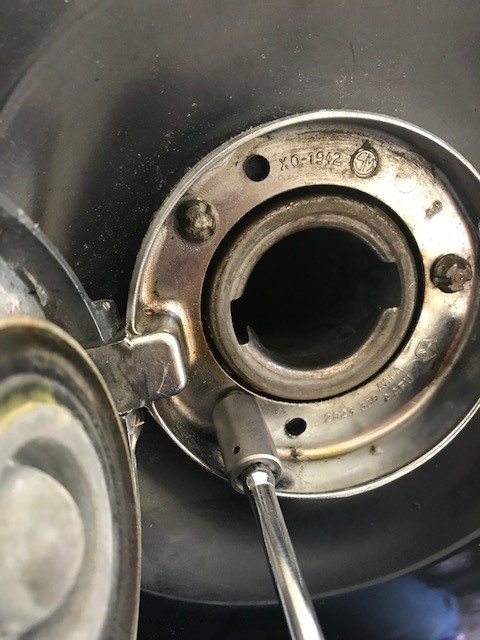
And just so you're not subjected to an all text post, here is the last picture I took while 'working' on the car. We had a random day of nearly 60 degrees. I had the day off, but also little motivation since it was at the tail end of my bout with the flu. I have been trying to figure out how to get the filler tank out, so I could put in the new tank properly. Everyone said 'try a gator grip', since they are security screws and I was trying not to spend another chunk of money on another specialized tool for 3 screws. I found a gator grip, promptly went out to get the screws out...and discovered the socket was too wide to fit into the space where the screws sit. That part had not occurred to me, of course.
So...I can get back on ebay and order the $20 socket that I will use for this one task; or, I can try to just shove the tank with the new gasket back onto the filler neck while it is still attached. I will most likely attempt without the tool and if it's just too much work or just won't work, then I'll get back on ebay.
I have a feeling I will be using the hell out of the gator grip, though!

Wondering what my list looks like now?
Torque all rear bolts (axle, etc)
Fill differential
Assemble rear drum brakes and connect all rear lines
Install fuel tank and connect lines (plus close off vent line on sender unit)

Finish sanding, filling, painting drivers side floor
Find nuts for front seat and reinstall

Assemble front disc brakes and attach all front lines
Bleed brakes
Have tires mounted to original rims and balanced as best as possible
Torque all front suspension bolts

...Then all the engine stuff will commence...fingers will be crossed, prayers will be said, animals will be sacrificed (in the form of celebratory burgers, hopefully) and breath will be held...

Just a few more weeks and I'm hoping to have more to report and more pictures to share.

Friday, November 17, 2017

A quick update on progress

My last post was on October 25! It is now November 17...almost Thanksgiving. The weather has definitely turned the corner to colder days. We've had a fair amount of rain over the past few weeks as well. It makes it hard to get motivated to go out into the ramshackle carport to fight with the parts I can't get to budge.
But, I managed to get a few hours in, here and there, during my days off.
The struggle with the distributor went on for several weeks. It resulted in more trips to Home Depot and Harbor Freight than I had hoped, but I finally found the winning combination: brute strength and a mid-sized pry bar.

It was a moment of sheer joy when that thing popped out. I was happy to have been warned that the distributor in my car did not have gears attached...that the end simply looked like a flat-head screwdriver. If I had not known that before removing the part, I would've thought I had broken the end off!

Once that was out of the way, I was able to loosen all the bolts on the intake manifold. I have not taken it out yet, however. I have a list of things I'd like to have done before the snow falls and/or working conditions are less than ideal.
So, even though I'm feeling good about moving forward with the engine, as far as removing parts and cleaning out the gunk, I'll likely be saving that for Spring.
In the meantime, I made the decision to forgo welding the trunk. The hole was fairly large, and definitely a welding job for someone in the know, but I just did not see myself attaining that skill (or equipment) in a timely manner. Instead, I chose to use a resin/fiberglass patch.

I had already done some patching over the small holes with Bondo body filler. It is unfortunate that I didn't think to just go with the fiberglass from the start, but I am hoping the overlapping of fiberglass over filler won't be too problematic.
I still have to get out there to sand and see how it looks, since the day I did it, I ran out of time doing other chores. ugh...life.
With that patch ready to sand, and then the trunk ready to prime (and possibly paint, in the future), I can finally get the new fuel tank in and tie up the fuel lines. With that done, I can finally finish hooking up the new brake lines and finish the front brake conversion and re-assemble the rear drums. The new shocks can go on, all around; and, I can get the tires mounted and ready.
Spring can be all about getting the engine and exhaust squared away and with any luck, it'll be on the road by summer.
Now, I'm not counting my chickens, by any means, but I'm finally at a place where I feel like I'm moving steadily forward.

Wednesday, October 25, 2017

Still at it...

Wow! My last post was in August! And it's almost November!?
It's not from lack of work...not that I'm 'killing it' with the progress, but I am making more of an effort to actually get out there and work before the weather gets too cold.
Upside, this year, is that I bought a lamp this past spring, which turned out to give off a ton of heat, so working later into the year is not out of the question.
This will be a short post. The past couple months have been a little hectic: in-law visit, vacation, dead fridge...you know...life getting in the way.
Hubby took a trip back to Ohio to see his folks and help a friend move, so I took some extra time off to concentrate on the car...but then the fridge broke and I spent a day fixing that instead. And, I'm not gonna lie...when I have the house to myself I become very unmotivated to do anything more than binge watch my guilty pleasures and get up early and bake.
But anyway, I did spend a day cleaning and sanding the rust in the trunk and getting a little bit of patch work done.
The trunk had so much rust that the jack stand had rusted to the spare. I had to knock it out with a hammer.

Sweep the big bits of rust, vacuum the rest...sand and brush, vacuum again...and on and on....

Removed as much rust as I could and prepared to just spray with filler. It was still sturdy, no give to it, luckily.
I managed to get the valve covers off to expose an unsettling amount of rust. So I spent some time cleaning those as well.


The trouble this time...the thing that has got me frustrated and questioning my sanity...the intake manifold and distributor.
My hope this month was to get the manifolds swapped out (original back in)...but there is one bolt that is inaccessible (as far as my ability) without removing the distributor (which I was really hoping to not have to do).
There is a bolt just behind that red lever that I just can't manage to get to. My hinged wrench kind of gets in there but then I have no leverage to get the power I need to get the bolt loose.
Okay, fine, I give...I'll remove the distributor. Off to the YouTubes I go...'mark this, mark that'...take the cap off...slip it right out...
Um...no...it does not 'slip right out'. In fact, it feels pretty cemented in there.
Not budging at all. Tried a flathead screwdriver to loosen the seal and pry, but again...space is limited there.
I've tried all I can think of and can only guess that the seal is just really tight and maybe I can pry it out with a mini pry bar. Or, worse, is that it's somehow fused/rusted at the gear end, inside the engine. (that thought, of course, makes me want to cry)

With the wind and the rain today, I'm not likely to get out there and work, but somehow, sometime soon I need to figure out a way the get the distributor out...or at least a way to get that hidden manifold bolt out.
Here's hoping my next post is about how I finally figured it out!

Thursday, August 17, 2017

Patchwork fuel line

Two posts in one day!? ugh, I know...
To be fair, this is my documentation of this madness, and my memory is crap so I need to get stuff down before it's gone.
Again, I had one real goal today and that was to work on the car for a few hours. My secondary goals were to finish up the fuel line and possibly continue drilling the bolt hole. Then, of course depending on my energy and state of mind, maybe move onto something else on the list.
'Real goal': accomplished. I worked for about 3 and a  half hours before succumbing to hunger. I forgot to eat before heading out to get to it. I also forgot I got up at 4 and was out the door at 5 this morning for a 30 minute run. And 3 hours seems to be my 'time to beat', I did okay.
'Secondary goal #1 (fuel line)': accomplished!
It was very slow going, as I am still not skilled at the art of line bending. It was terribly frustrating and it's not the perfectly bent line I was hoping to install when I bought a 'pre-bent line', but somehow I managed to get the line in and bolted/bracketed in.
 As I mentioned with my first post, today...these two lines needed to be connected...
 

After some more cutting and bending and fighting and cursing and comparing the new bends with the bends in the old line (which of course I kept for reference!) and more struggling...I finally got bends to match up enough to get the new line into the hooks.
Not an exact match, but the new line is in tight and ready for the new tank!
I wasn't really sure about adding the rubber line. I've watched multiple videos about it. I've double checked fuel hose ratings. I changed the blade in my utility knife. I had my box of assorted clamps. And I've put off enough stuff due to anxiety that I just had to do it. 
I think I did a pretty good job!
I mean...it looks right...
Next up was the front end. This where I had to do more research. I was under the impression that the original lines were 3/8, rather than the 5/16 that they actually were. So I bought a sending unit in 3/8"....and fuel line for 3/8"...but for some reason, my new pump to carburetor lines are the proper 5/16". So after some inquiries in the forums, I was told that if I had 3/8" from tank to the front, that I could simply get an adapter to connect the 3/8 fuel line to a short run of 5/16 line to the fuel pump!
So, I did!
before..
after!
That was, after all the struggle with getting the line to shape/fit in properly at the rear...then realizing I needed to do more bending at the front end to get the line tight into it's final bracket, just about all I could do. 
I spent a little more time trying to figure out the grease fitting issue but I didn't want it to put me in a mood, so I backed off.

I feel good about the time I've spent on the car over these past couple days. It's not a lot on paper, but forward progress is forward progress!